Skip to content

MuggleNet

  • Site
    • Contact Us & FAQ
    • History
    • Meet the Team
    • MuggleNet Live!
    • Press
    • Publications
    • Special Projects
    • Volunteer with Us!
    • Year in Review
  • Podcasts
    • Alohomora!
    • Full Circle
    • LITHAPPENS
    • Potterversity
    • Promptly Potter
    • SpeakBeasty
  • Harry Potter
    • Book Quotes
    • Book Series
    • Coloring Books
    • Film Companions
    • Film Series
    • Hogwarts Library
    • Little Things
    • Music
    • Video Games
  • Fantastic Beasts
    • Book
    • Coloring Books
    • Film Companions
    • Fantastic Beasts Film Quotes
    • Film Series
    • Little Things
    • Music
    • Video Games
  • The Quibbler
    • Owl Post
    • Bathilda’s Notebook
    • The Department of MYTHteries
    • The Dirigible Plum
    • Into the Floo
    • Muggle Studies
    • The Pensieve Papers
    • The Three Broomsticks
    • April Fools’
    • The Quibbler Vault
  • The Daily Prophet
    • Book Trolley
    • Editorials
    • Event Reports
    • Exclusive Interviews
    • Features
    • Giveaways
    • Listicles
    • Merchandise Reviews
    • Movie Reviews
    • Television Reviews
    • Theater Reviews
    • Wizolympics
  • Muggle World
    • Charity
    • Exhibitions
    • J.K. Rowling
    • MinaLima
    • Quadball
    • Studio Tours
    • Theatrical Play
    • Theme Parks
    • Wizarding World Digital
  • Fans & Fun
    • Crazy Caption Contest
    • Fan Focus
    • Fandom
    • Fandom Sortings
    • Fandom Timeline
    • Fun Lists
    • Games and Trivia
    • GNOMEs
    • Potter DIY
    • Potter Weddings
    • #PotterItForward
    • Rosmerta’s Recipes
    • Song Parodies
    • Wizard Rock
    • Wizarding Wordle
  • Cosplay / Potter DIY

Potter DIY: Leather Wand Sheath

by Lauren Littler · August 16, 2016

First and foremost, you have to decide what kind of wand sheath you want. Something rustic and organic? Or something sleek and stylized? This DIY features making two different styles, and then it’s really up to you and your imagination. Each of the methods will cover the basics of leather working, leaving the customization up to you.

For the most authentic leather sheath, Tandy Leather is recommended for both sheaths.


The Organic Sheath Pattern
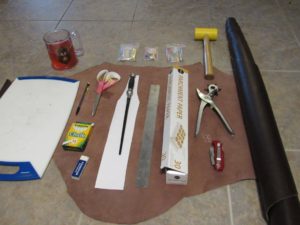
What You’ll Need:

  • A three-prong leather punch and/or a two-prong leather punch
  • A rivet punch
  • Brass rivets
  • A rubber mallet
  • Heavy-duty cutting board that can be ruined (This cutting board will never be able to be used for anything but leatherworking ever again. Plastic is preferred, but wood can work too.)
  • Wax thread and leather needle
  • Leather
  • A straight-blade knife, like a box cutter
  • Thin, white chalk


Directions:

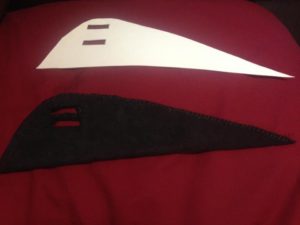
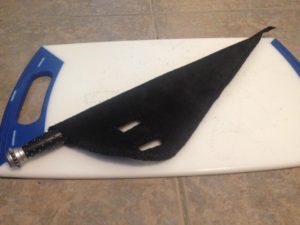
Step 1: It’s time to work with the leather. What we chose for this project was a medium-weight black suede leather, especially because Helga Hufflepuff’s colors are gold and black. Lay out your leather and find a section relatively free of any natural deformities in the leather (which should be expected) to work with. Suede leather has a light side and a dark side. The dark side is the “finished” side, which is going to be the outside of the sheath. Trace the pattern on the “light,” unfinished side. You can either trace out two different pieces of leather to sew together or flip your pattern over to create one piece of leather that will be folded over before being sewn.


Tracing Leather Pattern


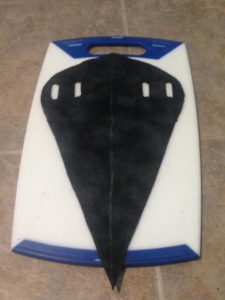
Step 2: Once you’re done tracing, get out your cutting board and straight blade. Put the cutting board under the leather and slowly work your way around the outline with the straight blade. Take it slow and easy. Cut out the belt holes next, being even more careful since they are much smaller. Once you have everything cut out, we’re ready to move on to sewing.


Cut Out Leather Pattern


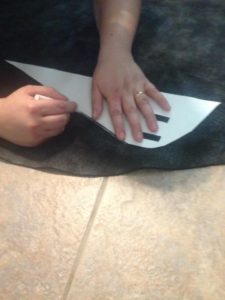
Step 3: For this part, you’re going to need the leather punches and rubber mallet. Either place your two leather pieces together or fold over your one piece of leather and line up the edges. Start with the belt holes. Use the two-prong leather punch and rubber mallet to create as evenly spaced holes as you can around the belt holes. The best part about wax thread is that it adheres to the leather and you only need one strand, as opposed to a traditional double-thread sewing technique. Sew them up using the leather needle and wax thread in a wrap stitch and use a binding knot to seal it at the end. This will keep the belt holes from degrading from constant use.


Sewing the Sheath


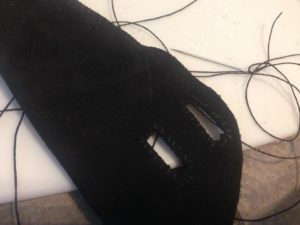
Step 4: Repeat the hole punching along the outer edges, once again as evenly as you possibly can. Try not to get too close to the edges and be careful with keeping the edges together. You’ll be doing the same wrap stitch when all the holes are completed. If you find that the holes have shrunk, just rehammer them into the leather with the smaller pronged tool and rubber mallet. When you’re done, tie a double binding knot to seal the wax thread.


Completed Wand Sheath


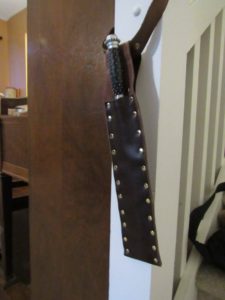
The Rustic Sheath Pattern
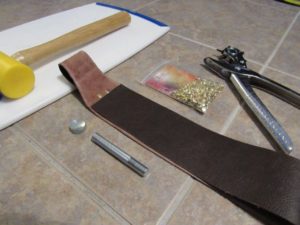
 

Leather Working Supplies


What You’ll Need:

  • A box-cutter or fabric scissors
  • A cutting board that can be destroyed
  • Some long paper (You can use parchment paper, but it’s very thin and very apt to curling up on itself, so if you find a better replacement, use that one.)
  • A pair of paper scissors
  • A pencil
  • A ruler
  • A rubber mallet
  • A rivet punch
  • A rivet anvil
  • A rivet setter
  • Small rivets (You can pick whatever style of rivets you’d like, as long as they are small and double-cap.)
  • Thin, white chalk
  • Leather (Thin, dark-brown lambskin was used for this DIY.)


Making the Pattern


Directions:

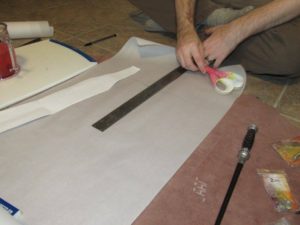
Step 1: Create your pattern on the paper and cut it out, making sure to measure it out against your wand and using the ruler. Get as creative as you want, but you can keep it simple with straight lines that can be easily checked by using a ruler.


The Pattern Traced Out On Leather


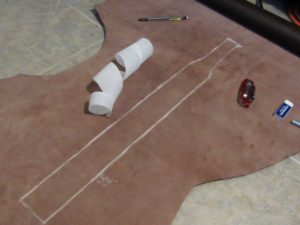
Step 2: Trace the pattern onto the “light,” or unfinished, side of the leather in the white chalk. Now, the leather was thin enough that it could be cut with fabric scissors but cutting it with a box cutter is also an option so that you can take your time and go slowly. After you cut out the leather, prep your workspace. Get your double-cap rivets, rivet anvil, rivet setter, rivet punch, and rubber mallet ready.


Riveting Tools


Punching a Hole


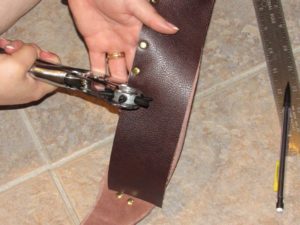
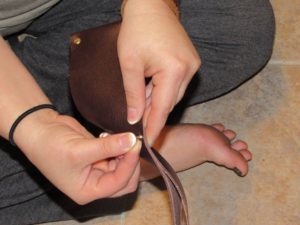
Step 3: The act of riveting leather is relatively easy. First, you’ll want to rivet the belt loop. Take the leather, bend it whichever way you’d like, and line it up on the front or back of the sheath piece. You can go backward, showcasing the unfinished leather for the belt loop.

Step 4: Next, use the pencil or a needle to mark where you’d like to punch the holes with the rivet punch. This belt loop is more about looks than actually measuring. You can use one, two, or as many rivets as you’d like, we used two. Prep your rivet bottoms and tops, and punch the holes into the leather.


Pushing the Pin Through


Step 5: Push the bottom section of your rivet, the piece with the pin, through the hole. Take the cap and connect them until you hear or feel the connection click. Next, move the rivet and leather so that one end of the rivet is centered on the rivet anvil. Place the rivet setter on the other side, and using the rubber mallet, hammer the rivet until it’s beaten into each other and is tight in the leather. Once you’ve riveted the belt loop to the sheath, you can work on riveting up the sides.


Hammering the Rivet


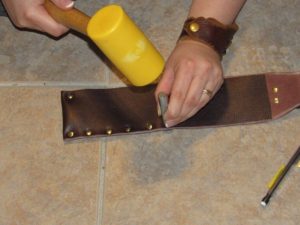
Step 6: Rivet the bottom corners before working your way up the sides at one-inch intervals. There will be some discrepancies at the corners, but that’s all right as long as the rivets line up.


Completed Riveted Sheath


You can also check out other DIYs such as making your wand or Hogwarts Blazer.


Want more posts like this one? MuggleNet is 99% volunteer-run, and we need your help. With your monthly pledge of $1, you can interact with creators, suggest ideas for future posts, and enter exclusive swag giveaways!

Support us on Patreon

Social:

  • Next story Expedition Wandless: Day 11
  • Previous story Wizolympics 2016: Body-Bind Surfing Final

MuggleNet Archive

Important Dates

June 2025

Sun, Jun 15

Kat Miller's birthday
Recurs yearly

Creative & Marketing Director

Tue, Jun 17

Umbridge sacks Hagrid; McGonagall is stunned and sent to St. Mungo's
Recurs yearly

1996

Wed, Jun 18

Battle of the Department of Mysteries
Recurs yearly

1996

Sirius is murdered by Bellatrix
Recurs yearly

1996

WWoHP Hogsmeade at Universal Orlando's anniversary
Recurs yearly

2010

Thu, Jun 19

Dumbledore tells Harry about the lost prophecy
Recurs yearly

1996

Sat, Jun 21

Harry Potter and the Order of the Phoenix book
Recurs yearly

2003

Wizarding world knows Voldemort is back
Recurs yearly

1996

MuggleNet podcasts are sponsored in part by Secretlab.

Thanks to its research-backed ergonomic design, including a proprietary 4-way adaptive lumbar support system, the Secretlab TITAN Evo Harry Potter Edition will comfortably support you even when you’re up to no good.

Did You Know

The Golden Snitch was invented by Bowman Wright, a metal charmer who lived during the Middle Ages.

Potter History

October 31, 2004 – Three Harry Potter and the Half-Blood Prince chapter titles were revealed.

Potter Quote

“He knows what you were born, not who you are.”

MuggleNet is an unofficial Harry Potter fansite.
Please email us if you have any questions or concerns.
© 1999–2025 MuggleNet.com. All rights reserved.
Privacy Policy | COPPA Policy | Terms of Use | Feedback


MuggleNet is a participant in the Amazon Services LLC Associates Program and Bookshop.org's affiliate program, affiliate advertising programs designed to provide a means for sites to earn advertising fees by advertising and linking to amazon.com and bookshop.org.