Skip to content

MuggleNet

  • Site
    • Contact Us & FAQ
    • History
    • Meet the Team
    • MuggleNet Live!
    • Press
    • Publications
    • Special Projects
    • Volunteer with Us!
    • Year in Review
  • Podcasts
    • Alohomora!
    • Full Circle
    • LITHAPPENS
    • Potterversity
    • Promptly Potter
    • SpeakBeasty
  • Harry Potter
    • Book Quotes
    • Book Series
    • Coloring Books
    • Film Companions
    • Film Series
    • Hogwarts Library
    • Little Things
    • Music
    • Video Games
  • Fantastic Beasts
    • Book
    • Coloring Books
    • Film Companions
    • Fantastic Beasts Film Quotes
    • Film Series
    • Little Things
    • Music
    • Video Games
  • The Quibbler
    • Owl Post
    • Bathilda’s Notebook
    • The Department of MYTHteries
    • The Dirigible Plum
    • Into the Floo
    • Muggle Studies
    • The Pensieve Papers
    • The Three Broomsticks
    • April Fools’
    • The Quibbler Vault
  • The Daily Prophet
    • Book Trolley
    • Editorials
    • Event Reports
    • Exclusive Interviews
    • Features
    • Giveaways
    • Listicles
    • Merchandise Reviews
    • Movie Reviews
    • Television Reviews
    • Theater Reviews
    • Wizolympics
  • Muggle World
    • Charity
    • Exhibitions
    • J.K. Rowling
    • MinaLima
    • Quadball
    • Studio Tours
    • Theatrical Play
    • Theme Parks
    • Wizarding World Digital
  • Fans & Fun
    • Crazy Caption Contest
    • Fan Focus
    • Fandom
    • Fandom Sortings
    • Fandom Timeline
    • Fun Lists
    • Games and Trivia
    • GNOMEs
    • Potter DIY
    • Potter Weddings
    • #PotterItForward
    • Rosmerta’s Recipes
    • Song Parodies
    • Wizard Rock
    • Wizarding Wordle
  • Crafts / Potter DIY

Potter DIY: Cross-Stitch Your Own House Crest and Patch

by Fiona McTaggart, Karla Korson · March 28, 2021

Ever wanted to make your own House patch? I sure did. As someone who has always admired cross-stitch but never made a traditional one before, I was pleasantly surprised with how easy it was. Here are the steps I used to make a pattern for my Gryffindor cross-stitch, stitch the dang thing, and then turn it into a patch.


What You’ll Need:

  • Aida cloth (cross-stitch fabric)
  • 4-5 colors of embroidery floss to match your House
  • An embroidery needle
  • Scissors
  • An embroidery hoop
  • A sewing machine that can zig-zag and white thread (optional, for the patch)
  • Fusible interfacing (optional, for the patch)


Directions:

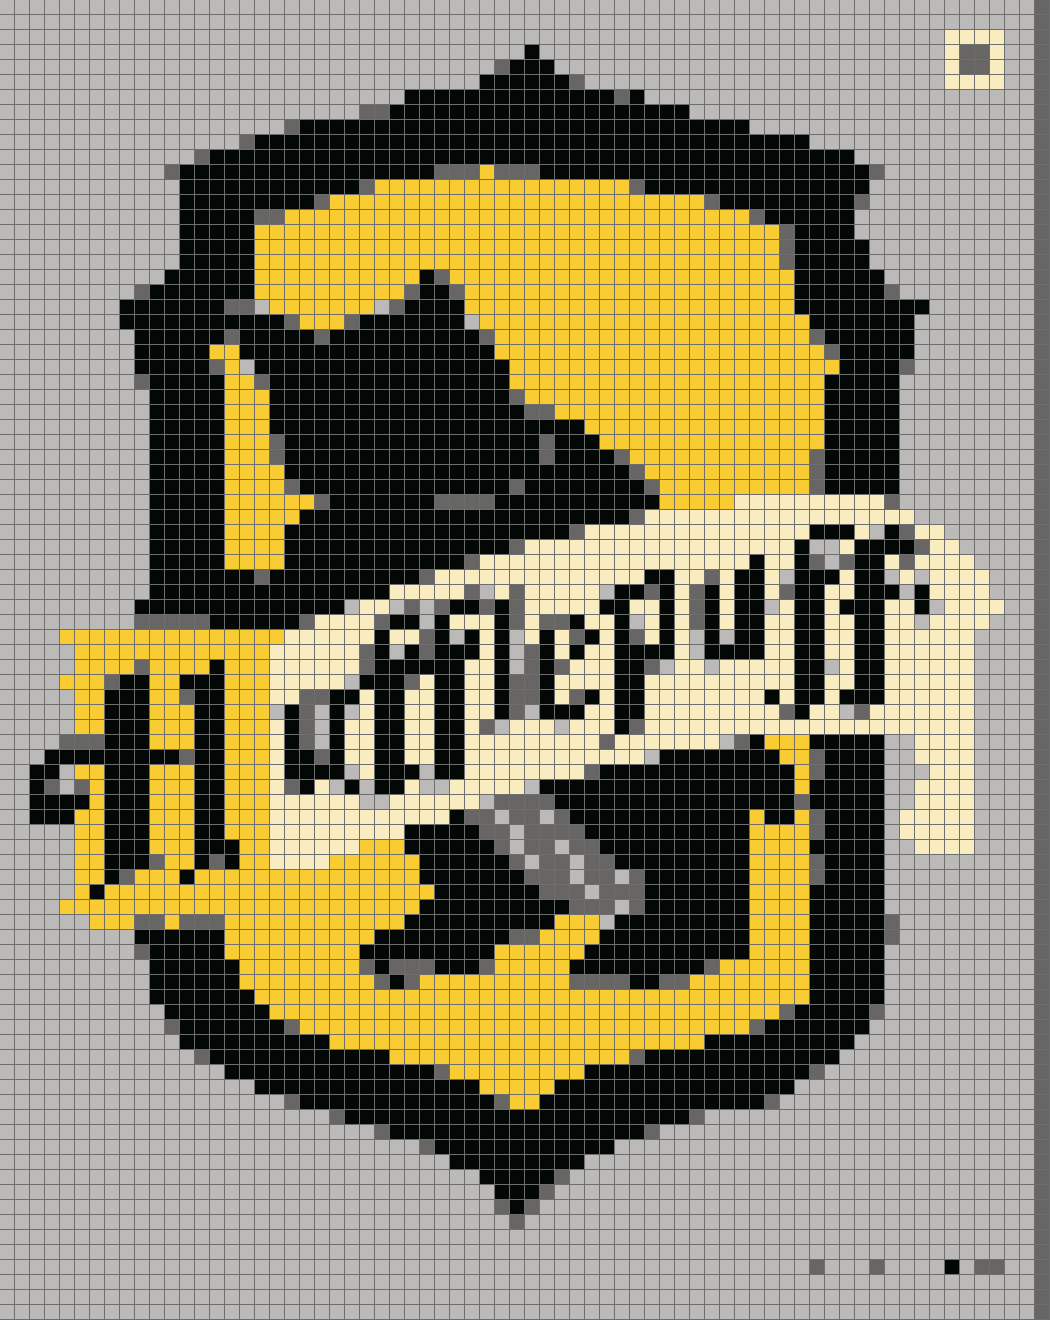
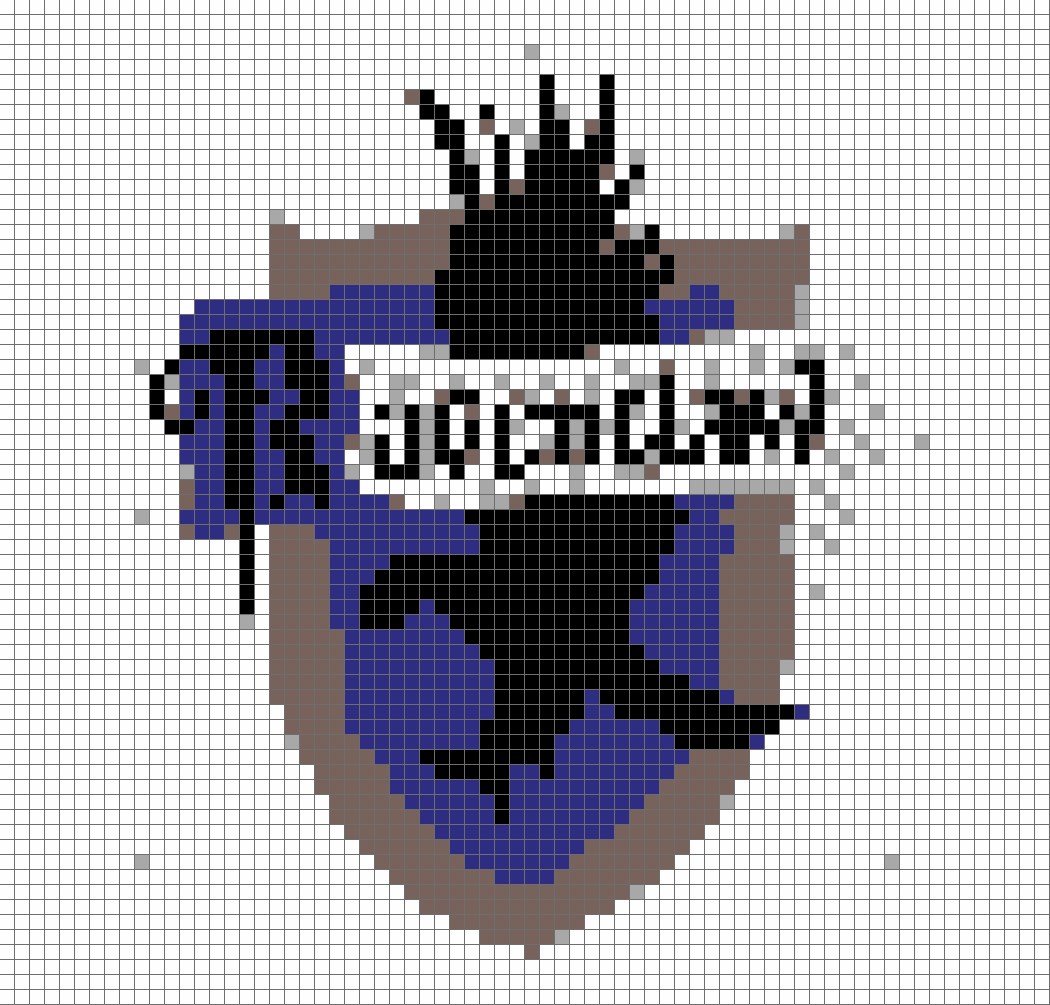
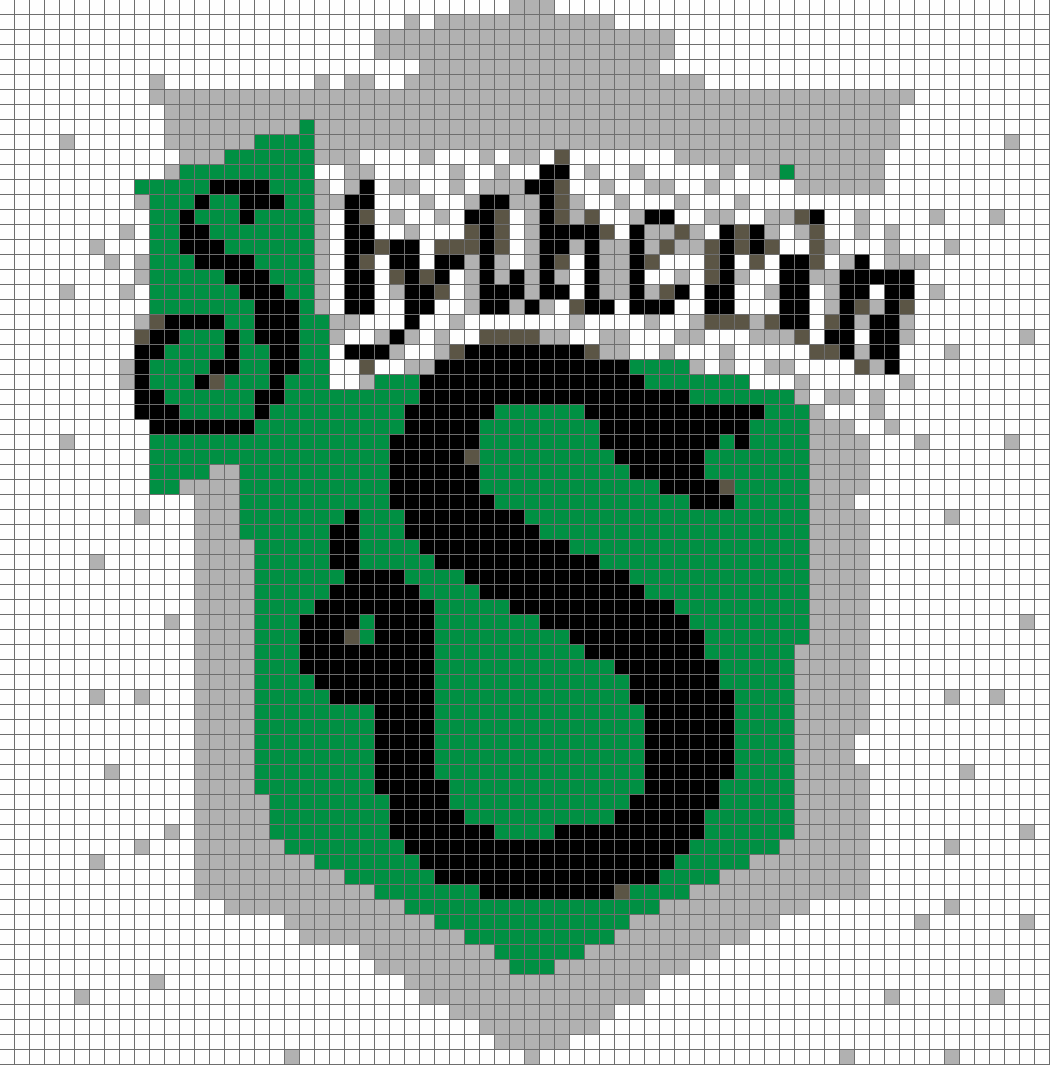
Step 1: The first step to making your House crest is designing the pattern. There are several ways you can do this, and I’ve included cross-stitch patterns of each House in this post if you’d rather just use one of them, but I’m going to walk you through how I made mine. First I found a simple rendering of the crest – try searching for “Pixel Art (your House here) Crest” or “Simple (your House here) Crest.” Unless you’re looking to do a very detailed rendering, the simplest design will work the best here. Once you find one you like, save it to your computer and upload it to an image-to-pattern site. Here‘s the one I used. Feel free to play around with the settings to find something you like that fits your supplies. To make the patterns below, the settings I used were:

Width (Number of Stitches): 70

Number of Colors: 5

Palette: All Colors

Count Aida: 14 (note that this needs to match the count on your Aida fabric)


Once you’ve chosen your settings, make sure the box next to “show grid” is selected, then go ahead and click “Create Embroidery Pattern.” Keep in mind that if you increase the width without decreasing your Aida count, you will end up with a larger final product. If you know which thread palette you have access to, make sure you select that as well. I just picked colors that looked similar rather than using the exact shades recommended. 


A cross-stitch pattern for the Hufflepuff crest.A cross-stitch pattern for the Hufflepuff crest.
A cross-stitch pattern for the Ravenclaw crest.A cross-stitch pattern for the Ravenclaw crest.
A cross-stitch pattern for the Slytherin crest.A cross-stitch pattern for the Slytherin crest.


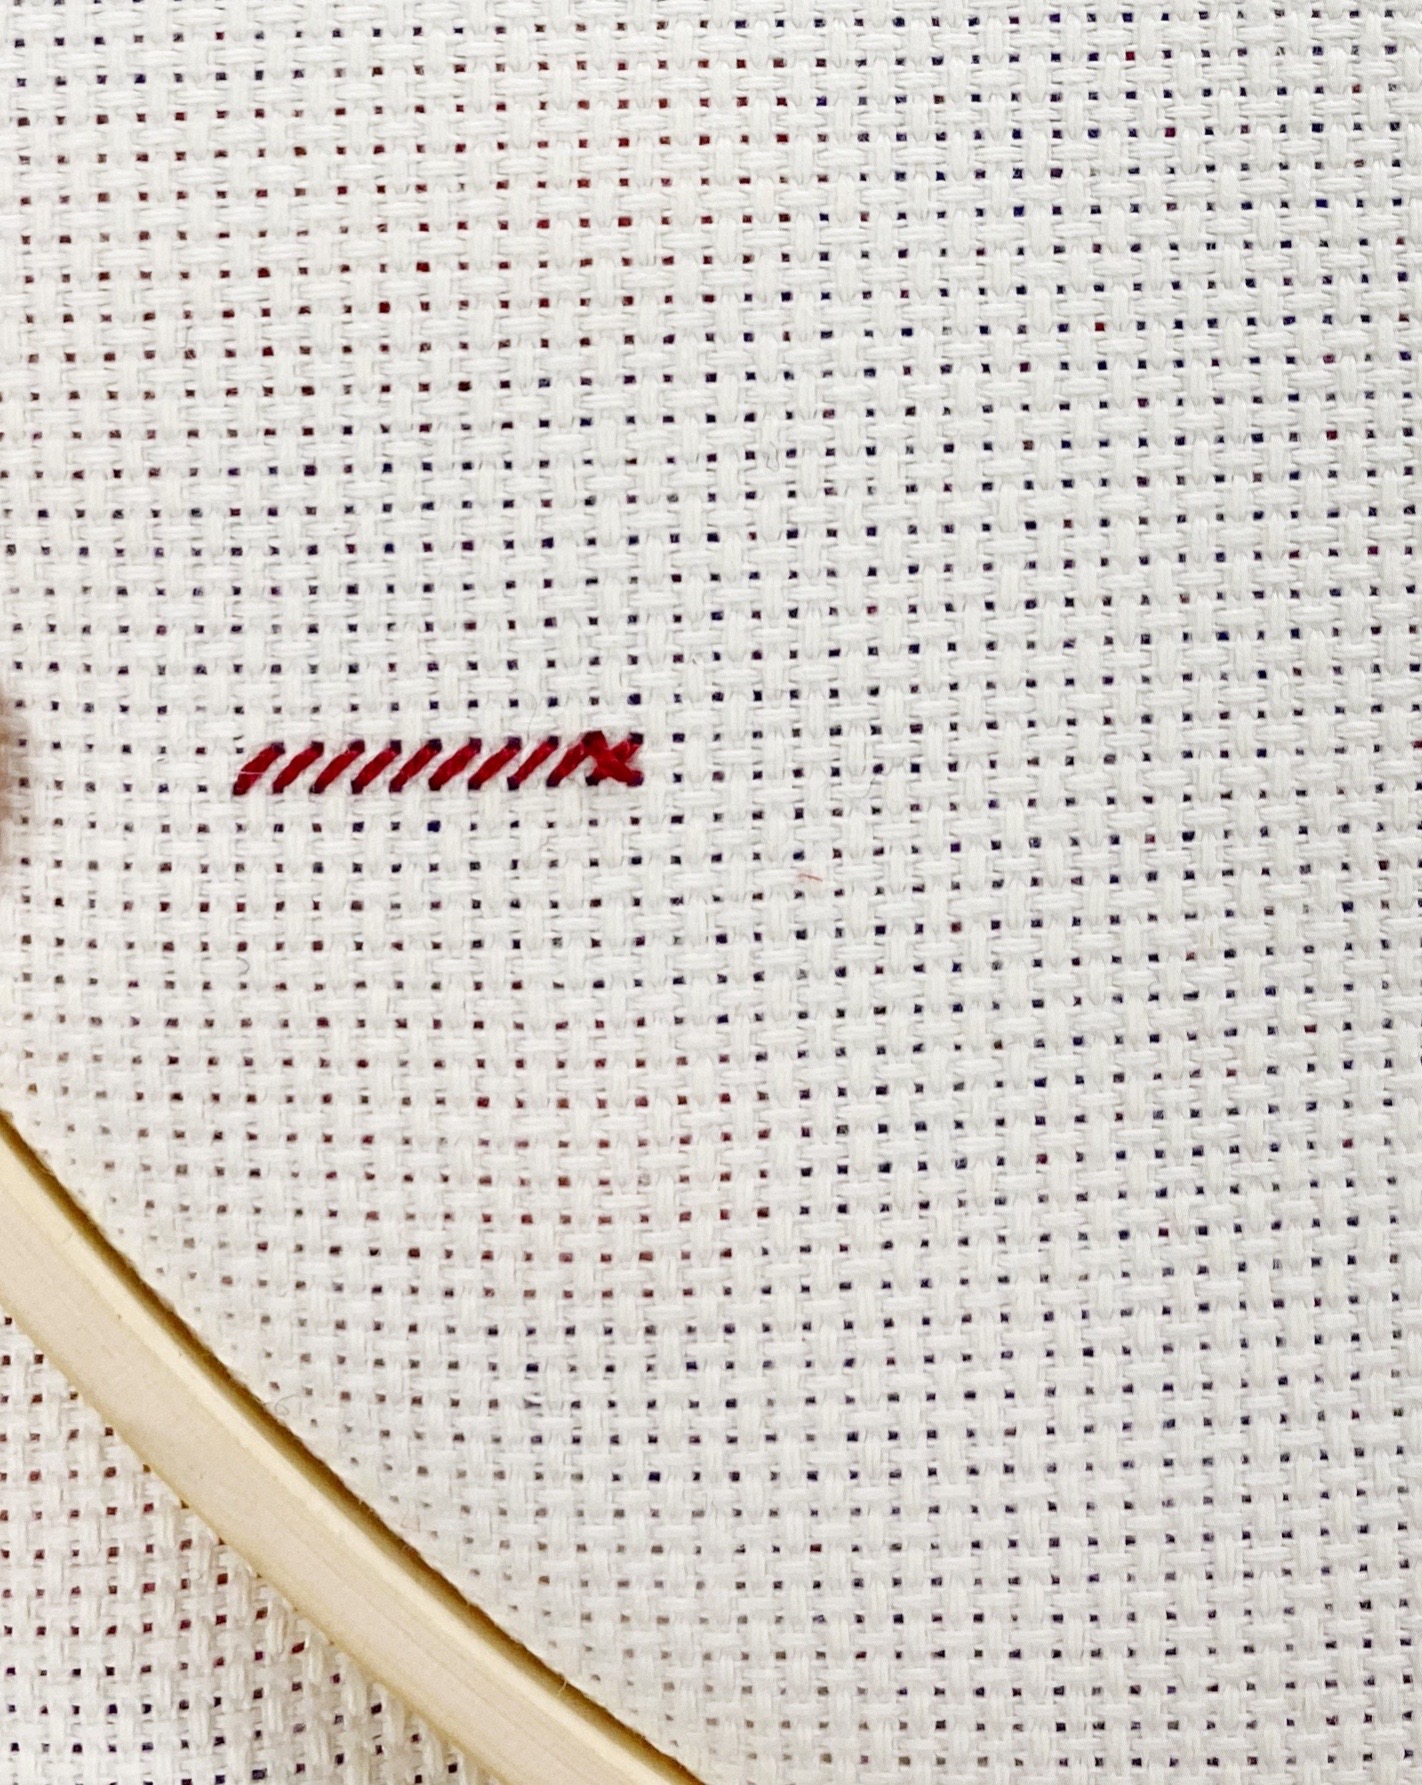
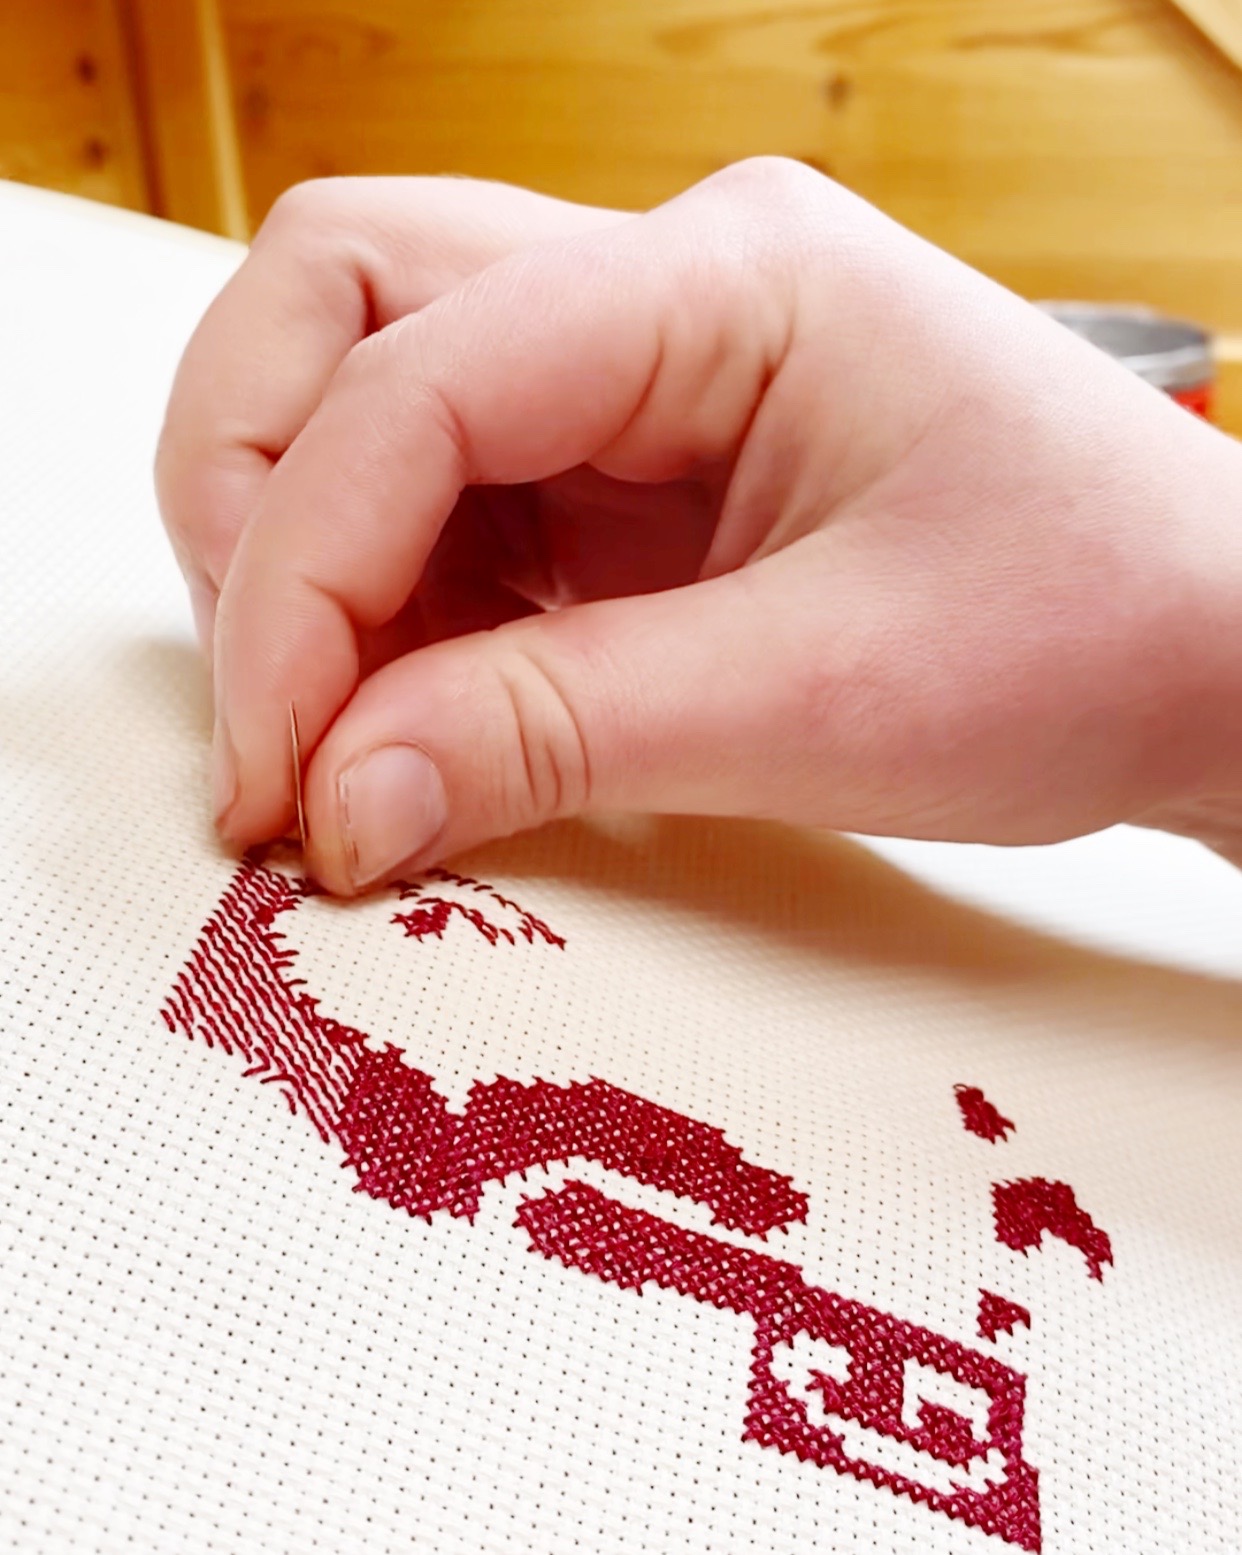
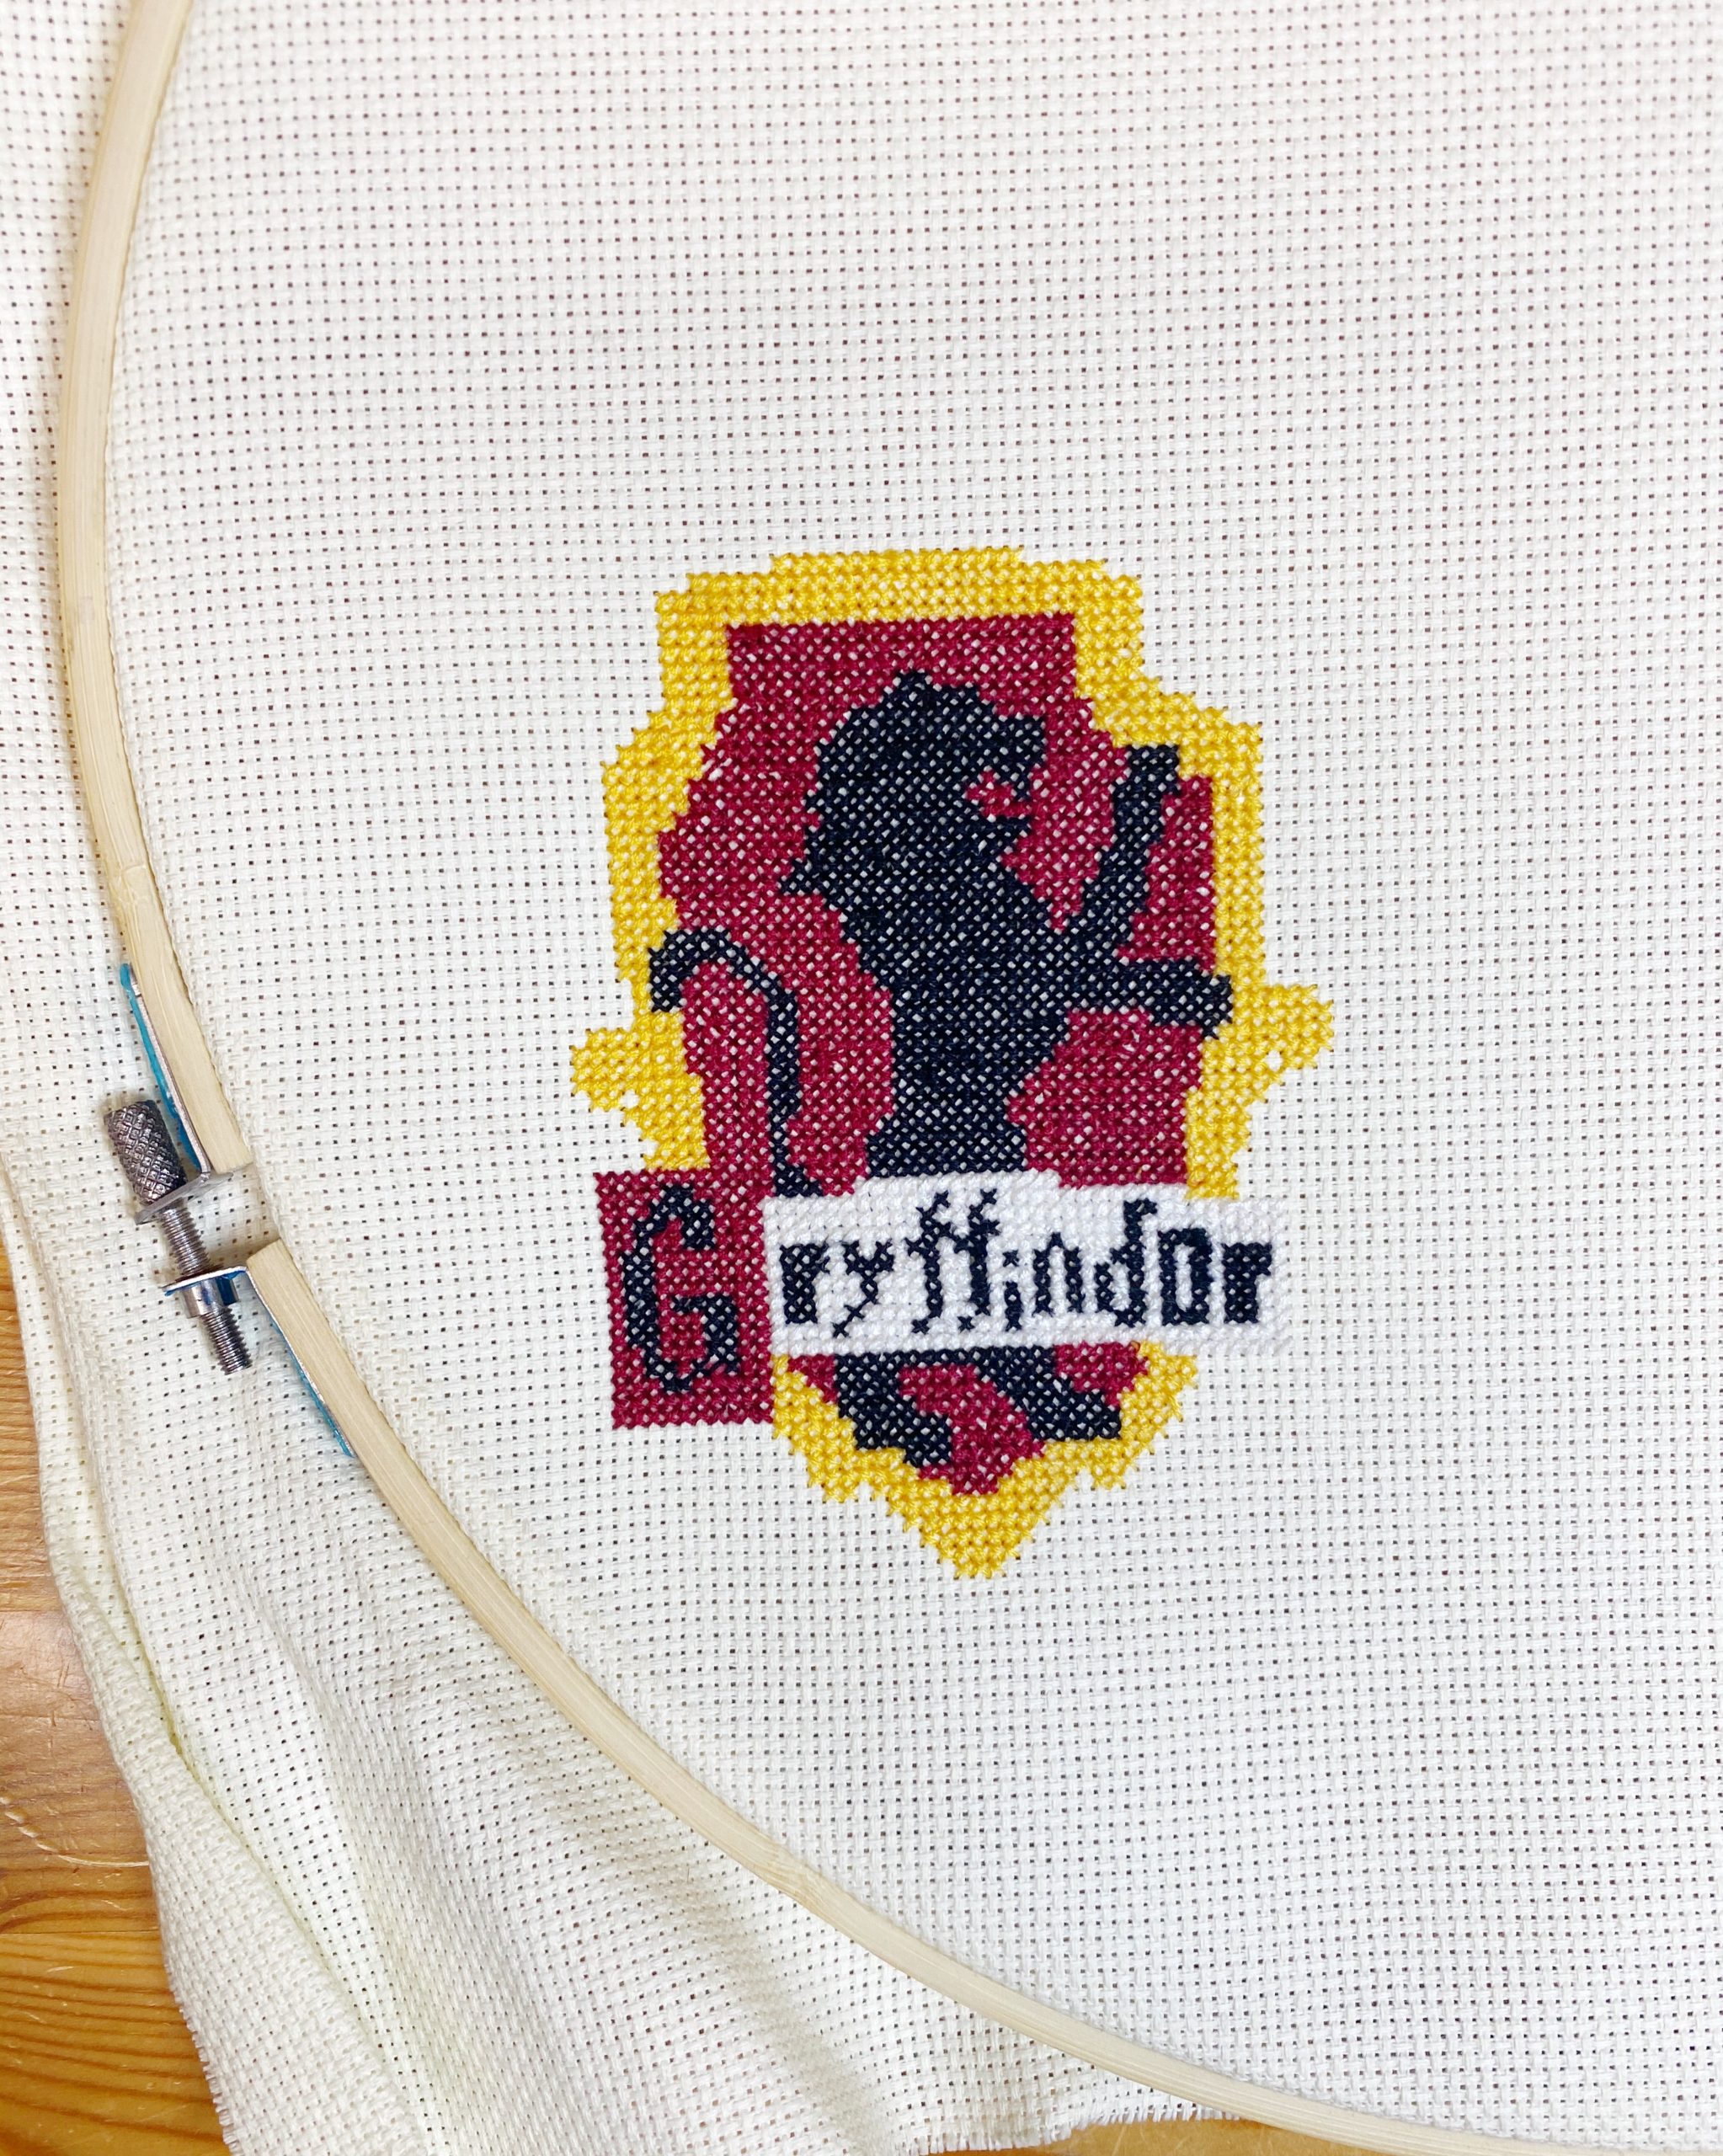
Step 2: Now that you have your pattern, it’s time to get stitching. Choose which color you’d like to start with and cut a length of 12-18 inches of embroidery floss. Separate two of the six thread strands from this section and thread them through your needle. Tie a knot in one end, and leave a tail on the other. Starting on the edge of your design (I started with the square around the G in Gryffindor) poke your needle up through the back of your fabric. Make a diagonal stitch to the next hole and pull it tight. Counting the stitches in your design, make a line of diagonal stitches, then work backward doing the opposite diagonal to form a row of X’s. When you get to the end of your thread or you’re switching colors, flip your hoop over and slide the needle underneath several other stitches, then snip the thread.


Gryffindor Cross StitchGryffindor Cross Stitch
Create a row of stitches.Create a row of stitches.
Tuck the end under the underside of your stitches.Tuck the end under the underside of your stitches.


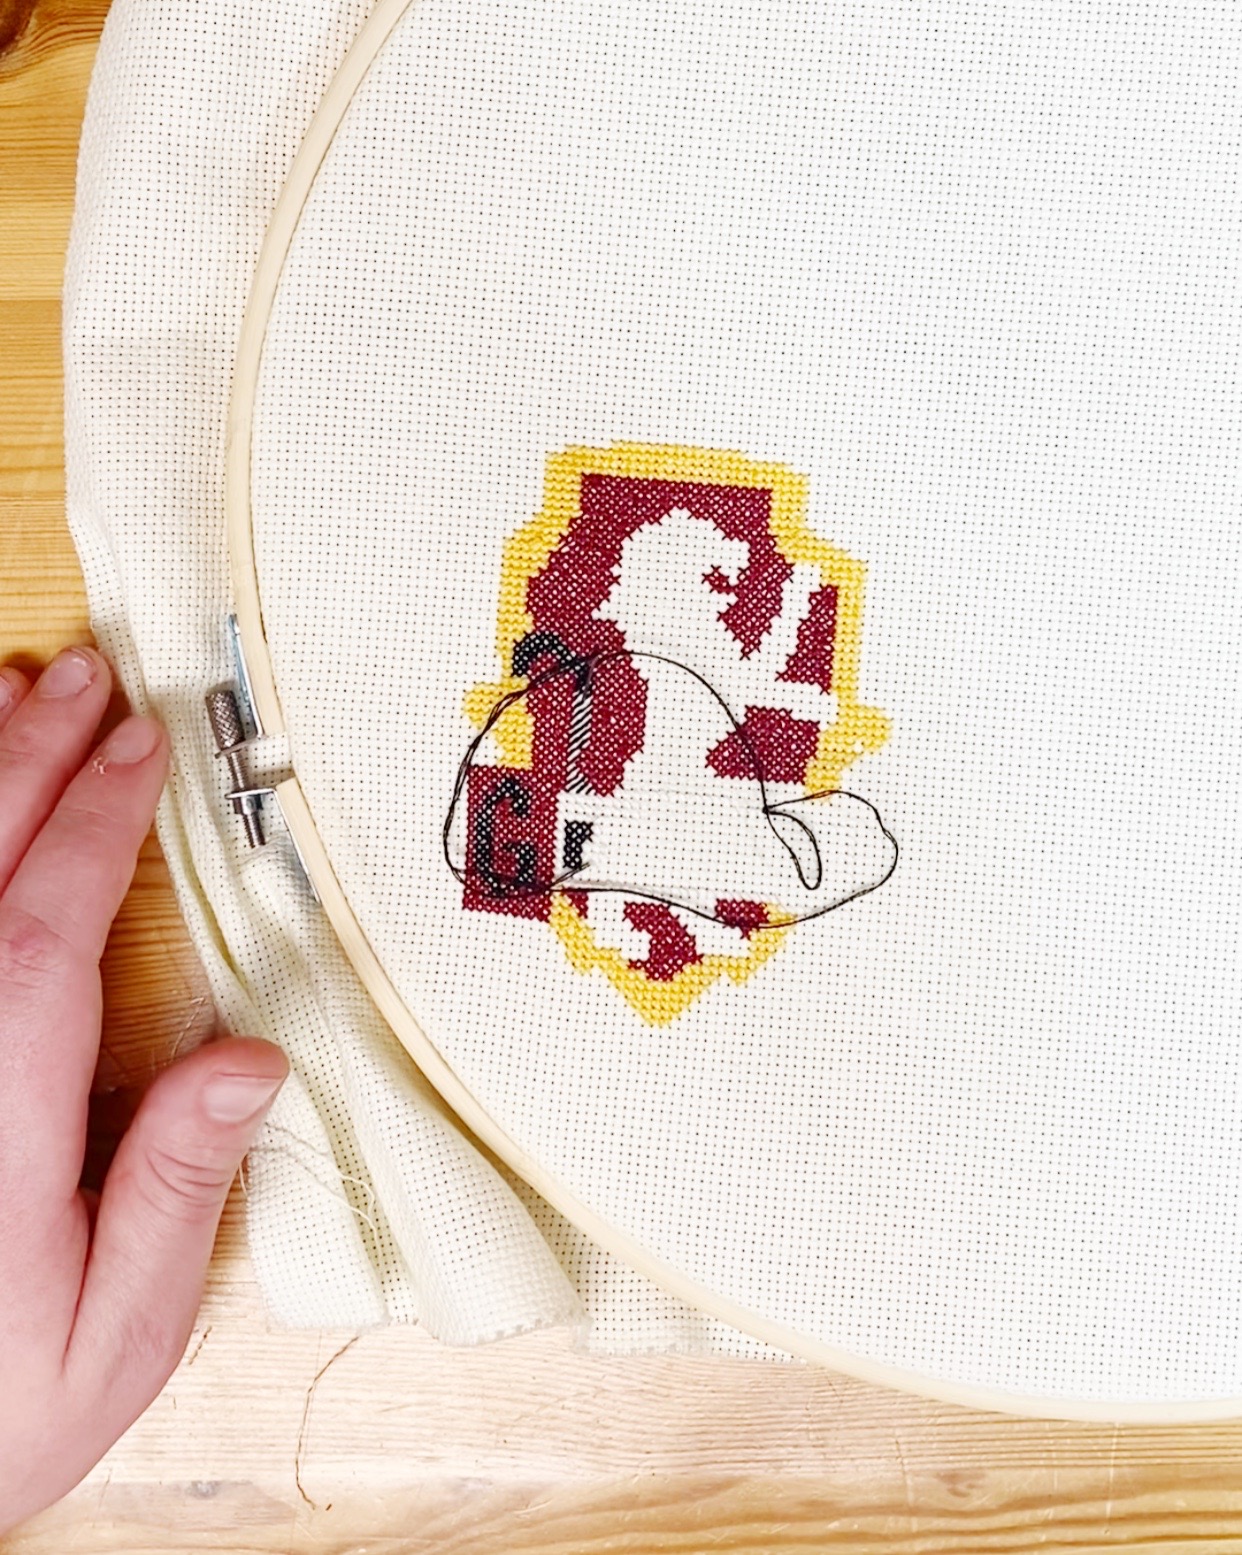
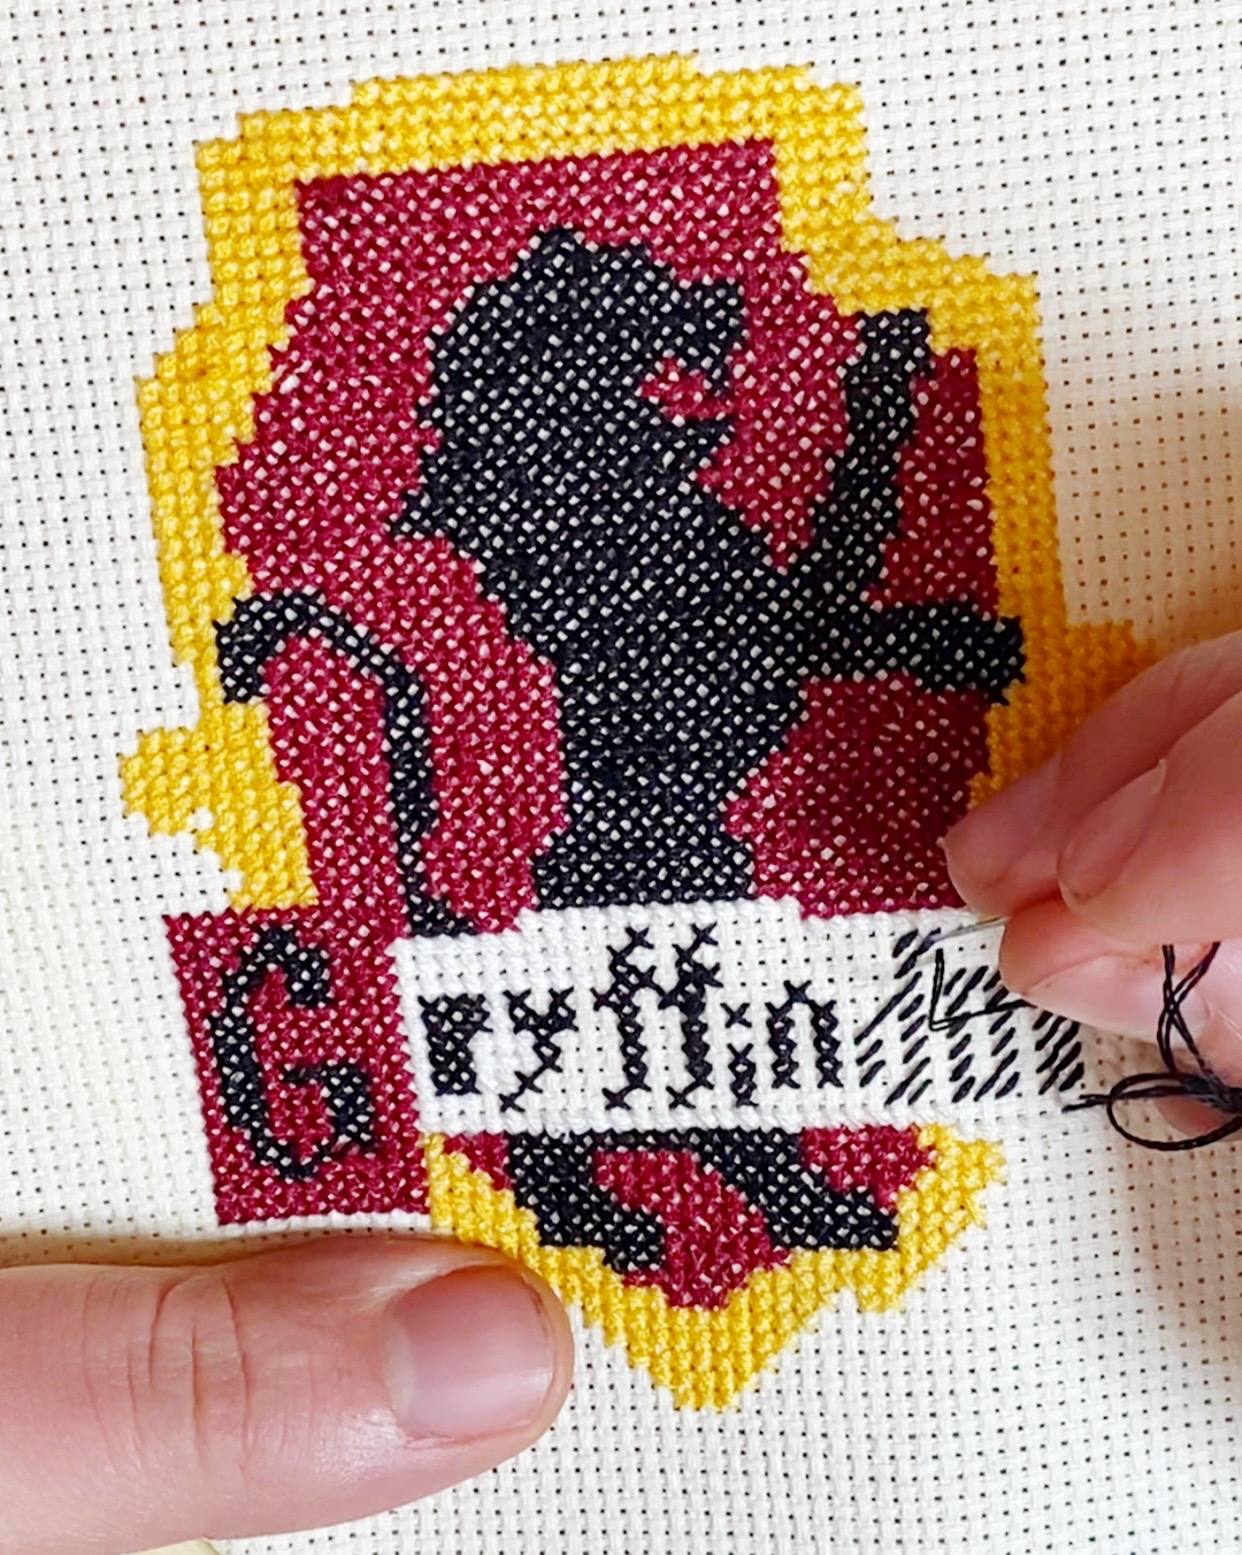
I like to fill in my design one color at a time. So, counting the stitches as I went, I filled in the outline of each red area with diagonal stitches, then filled in the center and completed the Xs for each section. Next, I did the yellow border, then the black lion, and finally the white nameplate and black letters.


I like to stitch one color at a time.I like to stitch one color at a time.
Once I was done the red, I moved on to yellow.Once I was done the red, I moved on to yellow.


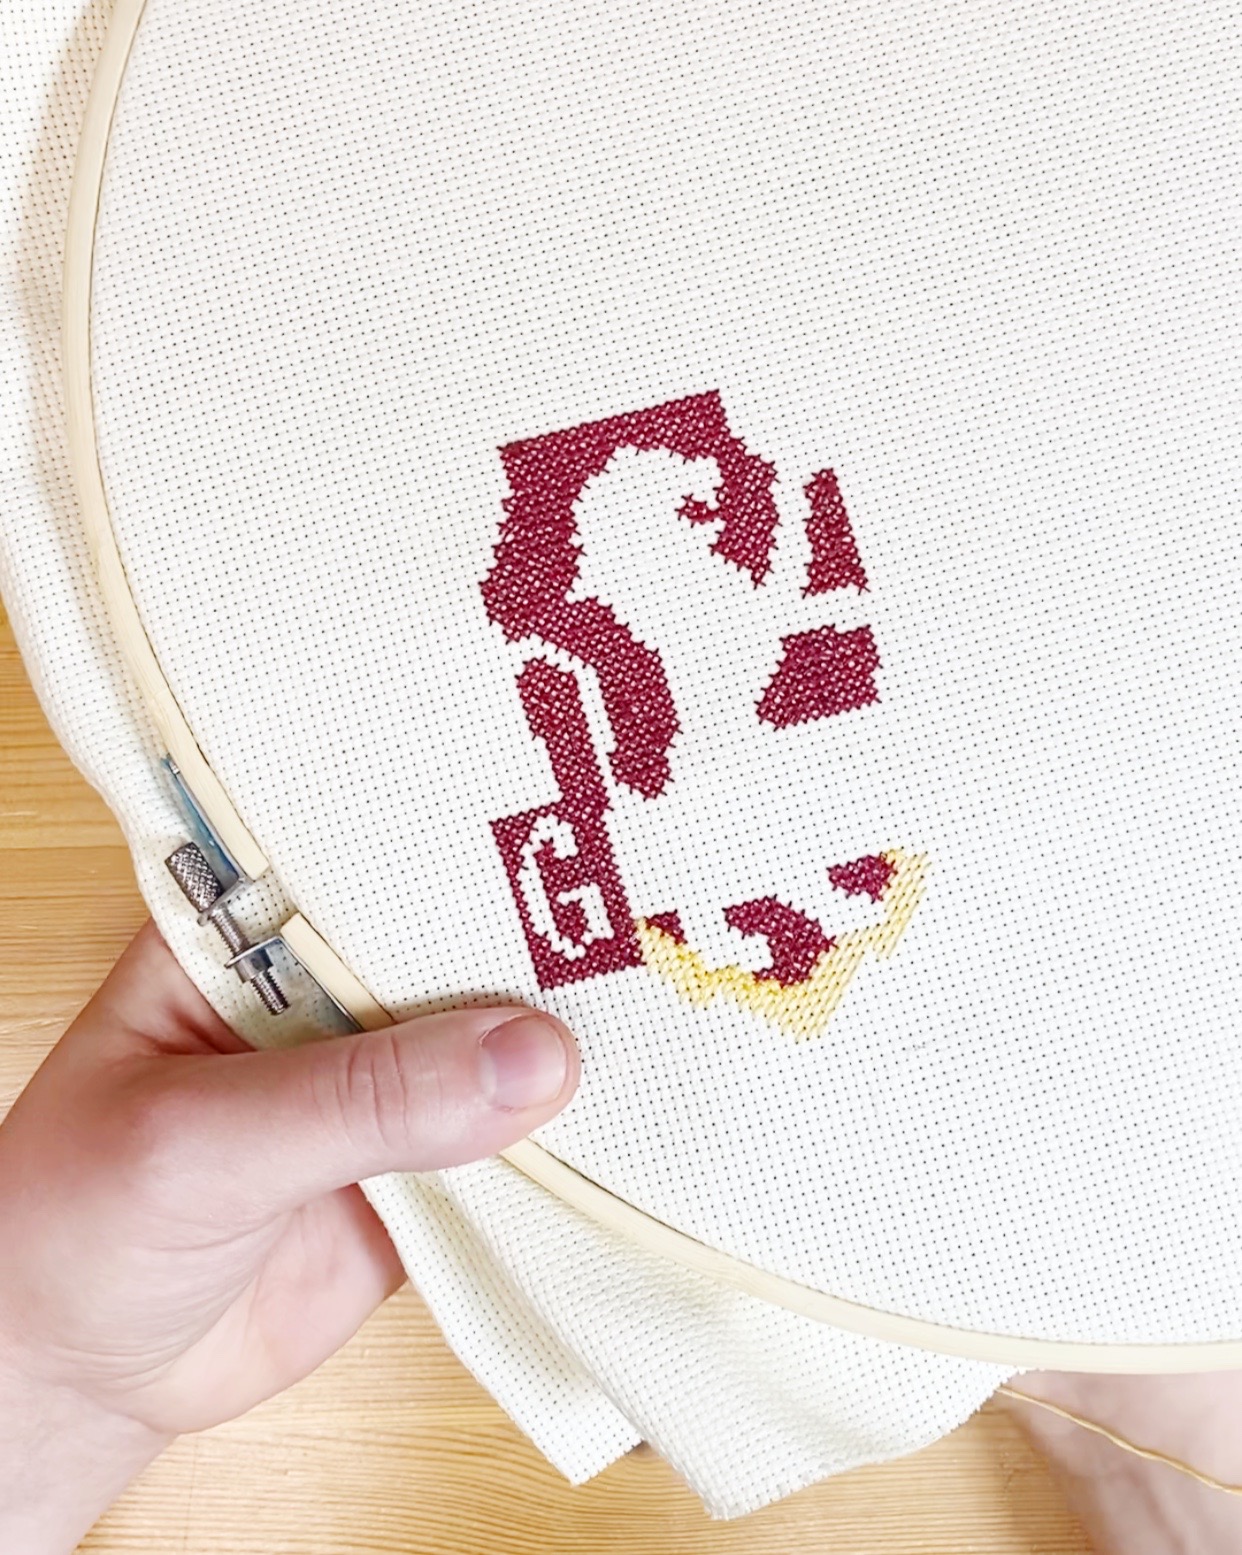
You can see that I added some straight stitches around the border of the nameplate in yellow thread since I wanted it to stand out a little bit more. Also, if you compare my final product to the original pattern, you’ll see I didn’t copy it exactly – there were a couple of places where I either had to account for a mistake or I just wanted to smooth out the pattern a little. 


Once I was done the yellow, I moved on to the red.Once I was done the yellow, I moved on to the red.
Here I am adding the black letters.Here I am adding the black letters.
The stitching is all done!The stitching is all done!


Step 3: Once your cross-stitch is finished, you can either finish the edges traditionally or do what I did and turn it into a patch. Loosen your hoop and remove it from the fabric. I gave mine a nice iron and steam to flatten it out again, then roughly cut the shape out of both my Aida cloth (leaving about 1/2 an inch of seam allowance) and my fusible interfacing. I then used my iron to fuse the interfacing to the back of my cross-stitch. Once it’s securely attached with no wrinkles. I then trimmed the edges more carefully, leaving just over a 1/4 of an inch at the edges. To finish the patch, I stitched the edges using white thread and the zig-zag setting on my sewing machine. I set the stitch length to 0.2 and the stitch width to 5.


Cut out some fusible interfacing to match your patch.Cut out some fusible interfacing to match your patch.
Use a zig-zag stitch to finish the edges.Use a zig-zag stitch to finish the edges.


There you have it – your very own House patch. I’m not sure what I’ll attach mine to yet, though I do have a cloak project in the works that might look pretty smashing with a Gryffindor patch as a final touch. Now that I know how easy it is (and how great an excuse cross-stitching is for watching TV,) I may just have to make one for every House. Let us know if you make one, and tag us in your pic!


Want more posts like this one? MuggleNet is 99% volunteer-run, and we need your help. With your monthly pledge of $1, you can interact with creators, suggest ideas for future posts, and enter exclusive swag giveaways!

Support us on Patreon

Social:

  • Next story Sorting “Bridgerton” Characters into Hogwarts Houses
  • Previous story Domhnall Gleeson Stars Alongside His Brother in New Comedy Series “Frank of Ireland”

MuggleNet Archive

Important Dates

June 2025

Sun, Jun 15

Kat Miller's birthday
Recurs yearly

Creative & Marketing Director

Tue, Jun 17

Umbridge sacks Hagrid; McGonagall is stunned and sent to St. Mungo's
Recurs yearly

1996

Wed, Jun 18

Battle of the Department of Mysteries
Recurs yearly

1996

Sirius is murdered by Bellatrix
Recurs yearly

1996

WWoHP Hogsmeade at Universal Orlando's anniversary
Recurs yearly

2010

Thu, Jun 19

Dumbledore tells Harry about the lost prophecy
Recurs yearly

1996

MuggleNet podcasts are sponsored in part by Secretlab.

Thanks to its research-backed ergonomic design, including a proprietary 4-way adaptive lumbar support system, the Secretlab TITAN Evo Harry Potter Edition will comfortably support you even when you’re up to no good.

Did You Know

“Harry Potter and the Philosopher’s Stone” was first published on June 26, 1997, by Bloomsbury. There were only 500 hardback copies printed for the initial print run.

Potter History

October 4, 2005 – Over 300 million copies of Half-Blood Prince were sold across the world.

Potter Quote

“Have a biscuit, Potter.”

MuggleNet is an unofficial Harry Potter fansite.
Please email us if you have any questions or concerns.
© 1999–2025 MuggleNet.com. All rights reserved.
Privacy Policy | COPPA Policy | Terms of Use | Feedback


MuggleNet is a participant in the Amazon Services LLC Associates Program and Bookshop.org's affiliate program, affiliate advertising programs designed to provide a means for sites to earn advertising fees by advertising and linking to amazon.com and bookshop.org.